Frontend Performance Optimization
Complete Guide to Code Splitting, Preloading, and Bundle Optimization
Frontend Performance Optimization: Code Splitting, Preload, and Prefetch
In this comprehensive document, I want to explain practical techniques for frontend performance optimization, focusing on code splitting, preloading, and prefetching. To understand these concepts, we first need to clarify what a bundle is and why it matters. From there, I will cover optimizations at the application level, bundle level, and asset level, followed by key performance metrics and a priority guide for implementation.
I will also clarify the relationship between code splitting and bundle splitting, and distinguish between resource prefetch and data prefetch to avoid common confusion.
 Figure: Visualizing how code splitting reduces initial bundle size.
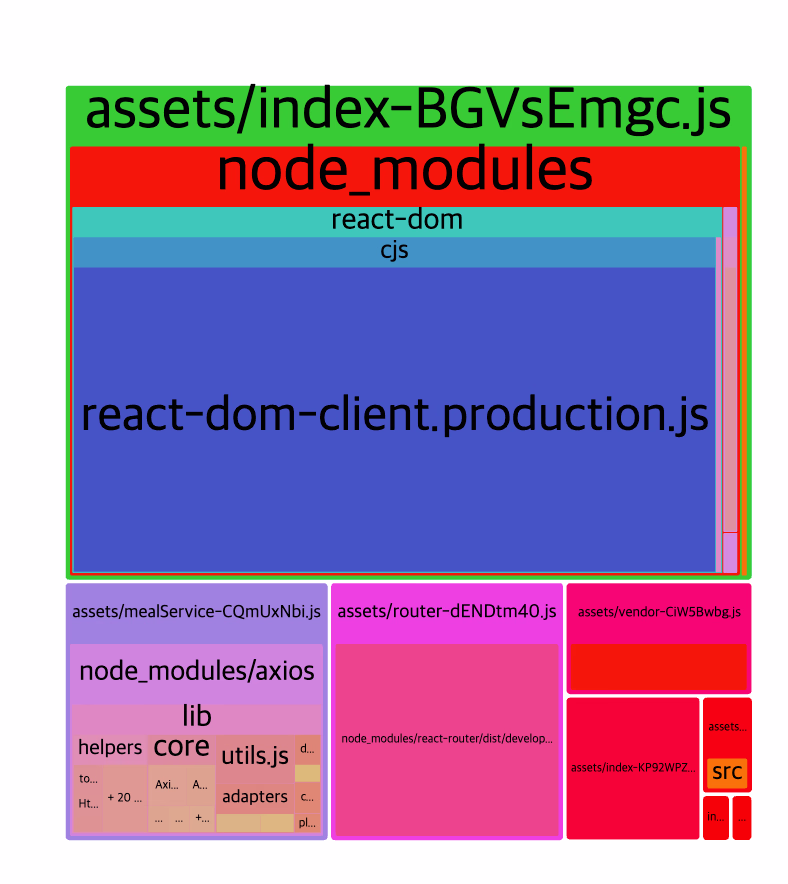 Figure: Bundle analyzer showing size breakdown before optimization.
1. Application-Level Optimizations
Optimizations at the application level focus on how React applications manage state, handle user interactions, and render UI efficiently.
1.1 State and Data Handling
React Query
React Query provides an effective caching layer for API-driven applications. Instead of fetching data on every navigation, it returns cached results instantly and updates in the background. This reduces redundant API calls, improves responsiveness, and eliminates unnecessary loading spinners.
// Before: redundant requests on every navigation
const UserProfile = () => {
  const [user, setUser] = useState(null);

  useEffect(() => {
    fetchUser(userId).then(setUser);
  }, [userId]);

  return <div>{user?.name}</div>;
};

// After: cached results + background refresh
const UserProfile = () => {
  const { data: user } = useQuery(["user", userId], () => fetchUser(userId));

  return <div>{user.name}</div>;
};
Optimistic UI Updates For interactive applications, React Query also supports optimistic updates, where the UI updates immediately while the API request completes in the background. This technique improves perceived performance in actions like form submissions or toggling states.
Debouncing API Calls
When handling search or input-based API calls, applying debounce prevents sending a request on every keystroke. Instead, requests are triggered only after the user pauses typing.
function SearchBox() {
  const [query, setQuery] = useState("");
  const debouncedSearch = useCallback(
    debounce((q) => fetchResults(q), 500),
    []
  );

  return (
    <input
      value={query}
      onChange={(e) => {
        setQuery(e.target.value);
        debouncedSearch(e.target.value);
      }}
    />
  );
}
Large Lists: Virtualization
When rendering thousands of list items, virtualization techniques render only the visible portion of the list. Libraries like react-window and react-virtualized dramatically reduce DOM nodes and improve scroll performance.
import { FixedSizeList as List } from "react-window";

const Row = ({ index, style }) => <div style={style}>Row {index}</div>;

<List height={400} itemCount={10000} itemSize={35} width={300}>
  {Row}
</List>;
1.2 Component-Level Optimizations
Memoization
- React.memo: Prevents unnecessary re-renders of functional components.
- useMemo: Caches expensive calculations.
- useCallback: Memoizes function references to avoid re-creation.
👉 Avoid anonymous functions in props. If a new function is created on every render, memoization is ineffective. Always wrap handlers with useCallback.
// Bad: new function each render
<MyButton onClick={() => doSomething()} />;

// Good: stable function reference
const handleClick = useCallback(() => doSomething(), []);
<MyButton onClick={handleClick} />;
Proper Key Usage
When rendering lists, always use stable and unique keys. Avoid using array indices as keys because they can cause unnecessary re-renders and state mismatches.
Fragments Instead of Wrappers
Use Fragments (<> </>) instead of extra <div> elements to avoid unnecessary DOM nodes:
// Bad
<div>
  <h1>Title</h1>
  <p>Description</p>
</div>

// Good
<>
  <h1>Title</h1>
  <p>Description</p>
</>
2. Bundle-Level Optimizations
Optimizations at the bundle level focus on how code is packaged, delivered, and loaded in the browser. Since bundles are often the largest assets in a frontend application, reducing their size and improving load behavior directly impacts user-perceived performance.
2.1 What is a Bundle?
Modern applications like React are developed across multiple JavaScript files. A bundler (Webpack, Vite, Rollup, etc.) combines these into one or a few files called bundles.
-
Advantages
- Reduces the number of network requests
- Provides ES module compatibility across browsers
-
Disadvantages
- Large bundle size increases initial load time
- Users may download code they never use during the session
2.2 Bundle Splitting vs Code Splitting
Understanding the distinction between these two concepts is crucial:
Bundle Splitting
A bundle split divides a large bundle into smaller chunks. This is handled automatically or manually by bundlers.
- Example: separating vendor (library code) from app (application code) for better caching.
👉 Perspective: from the bundler’s side – how output files are divided.
Code Splitting
Code splitting is the developer’s strategy for loading only the code needed at runtime. Developers use mechanisms like dynamic import() or React.lazy to mark which parts of the app should load on demand.
👉 Perspective: from the developer’s side – how the code is structured for conditional loading.
Relationship Between the Two
- Code Splitting: developer declares how to split code
- Bundle Splitting: bundler generates multiple output chunks
- Runtime: the browser requests chunks only when necessary
2.3 Tree Shaking
Tree shaking removes unused (dead) code from bundles. Bundlers analyze import/export usage and eliminate functions or modules that are not referenced.
Example
// utils.js
export function add(a, b) {
  return a + b;
}
export function subtract(a, b) {
  return a - b;
}

// main.js
import { add } from "./utils.js";
console.log(add(2, 3));
Here, subtract is never used, so it will not be included in the final bundle.
Developer Considerations
For tree shaking to work effectively:
-
Use ES Modules (
import/export)- Avoid CommonJS (
require)
- Avoid CommonJS (
-
Avoid side effects
- Code that runs on import cannot be safely removed
-
Mark modules as side-effect free in
package.json
{
  "sideEffects": false
}
-
Avoid wildcard imports (
import * as utils from './utils')- Import only what you need
2.3 Code Splitting
Instead of creating a single large bundle, code splitting divides code into smaller chunks loaded on demand.
Developer Perspective: Code Splitting
const Dashboard = React.lazy(() => import("./Dashboard"));
const Settings = React.lazy(() => import("./Settings"));

<Suspense fallback={<div>Loading...</div>}>
  <Routes>
    <Route path="/dashboard" element={<Dashboard />} />
    <Route path="/settings" element={<Settings />} />
  </Routes>
</Suspense>;
- Each route loads only the required component bundle
- Reduces initial bundle size
- Defers loading of unused code
Bundler Perspective: Bundle Splitting
The bundler generates the actual chunks (dashboard.chunk.js, settings.chunk.js, etc.) based on the developer’s code splitting strategy.
2.4 Lazy Loading, Suspense, and Skeleton UI
Code splitting introduces lazy loading. While this speeds up initial load, it can cause delays when navigating to a new route.
- Suspense provides fallback UI while code is loading.
- Skeleton UI mimics the layout of the component to minimize perceived waiting.
<Suspense fallback={<SkeletonUI />}>
  <Chart />
</Suspense>
Skeleton UI Best Practices
- Mimics the layout of the final component with simple shapes
- Does not need to match the component 1:1, only provide visual feedback
- Example: avatar circle + text lines for a profile card
2.5 Preload vs Prefetch
Bundlers and browsers support resource hints to optimize when code is fetched.
Preload
<link rel="preload" href="/main-chunk.js" as="script" />
- High priority
- Immediately downloaded
- Used for critical CSS, fonts, and initial JS chunks
Prefetch
<link rel="prefetch" href="/about-chunk.js" as="script" />
- Low priority
- Downloaded during idle time
- Cached for future navigation
2.6 Framework-Level Prefetch
Frameworks use preload and prefetch automatically:
-
Next.js:
<Link href="/about" prefetch>triggers background fetch when link is in viewport or hovered
-
Webpack:
/* webpackPrefetch: true */adds<link rel="prefetch">
const Chart = React.lazy(() =>
  import(
    /* webpackPrefetch: true */
    "./Chart"
  )
);
2.7 Bundle Analysis and Compression
Bundle Analysis
Regularly analyze bundle size to identify large or unused dependencies.
- Tools: webpack-bundle-analyzer, rollup-plugin-visualizer
// vite.config.js
import { visualizer } from "rollup-plugin-visualizer";

export default {
  plugins: [visualizer({ open: true })],
};
Compression
Serve compressed assets to reduce transfer size.
- vite-plugin-compression supports algorithms such as gzip, Brotli, and zstd.
// vite.config.js
import viteCompression from "vite-plugin-compression";

export default {
  plugins: [viteCompression({ algorithm: "brotliCompress" })],
};
2.8 Code Splitting and Prefetch Combined Strategy
Understanding how to effectively combine code splitting with prefetching is crucial for optimal performance:
- Code Splitting only: fast initial load, but delays when navigating to new routes
- Prefetch only: heavy initial load, negating optimization benefits
-
Combined approach:
- Split code to keep initial bundle small
- Prefetch likely-needed chunks to reduce perceived delay later
This strategy provides the best of both worlds: fast initial load and smooth navigation.
3. Asset-Level Optimizations
Beyond application code, frontend performance also depends on how static assets such as images, CSS, and external resources are delivered. Optimizing these assets can drastically reduce load times and improve rendering performance.
3.1 Images
Lazy Loading
By default, <img> elements trigger network requests as soon as they are added to the DOM, even if they are off-screen. This causes unnecessary bandwidth usage and slows down initial page load.
Adding loading="lazy" delays image requests until the image is close to entering the viewport.
<img src="/gallery/photo1.jpg" loading="lazy" alt="Photo" />
How it works:
- Browser checks viewport position.
- Network request is sent only when the image is about to appear (typically a few hundred pixels before).
- Initial load is faster because unnecessary images are deferred.
Modern Image Formats
Use WebP or AVIF formats for better compression. These formats can reduce file sizes by 25–50% with little to no visible quality loss.
<picture>
  <source srcset="/image.avif" type="image/avif" />
  <source srcset="/image.webp" type="image/webp" />
  <img src="/image.jpg" alt="Example" />
</picture>
pictureelement provides fallbacks for browsers that don’t support modern formats.
3.2 CSS
Critical CSS
Render-blocking CSS delays the time until content is displayed. By extracting and inlining critical CSS (styles needed for above-the-fold content), you ensure the page renders faster.
<style>
  /* Example of inlined critical CSS */
  body {
    font-family: sans-serif;
    margin: 0;
  }
  header {
    height: 60px;
    background: #fff;
  }
</style>
<link rel="stylesheet" href="/main.css" />
This reduces First Contentful Paint (FCP) and improves perceived load speed. Tooling is typically required to automate critical CSS extraction.
3.3 Content Delivery Networks (CDNs)
For global audiences, asset delivery speed depends heavily on geography. A CDN serves static files from servers close to the user’s location, reducing latency.
-
Benefits:
- 40–60% faster load times for international users
- Improved availability and reliability
Services like Cloudflare, AWS CloudFront, or Netlify Edge make CDNs accessible even for smaller projects.
4. Performance Metrics
Optimizing without measurement is ineffective. Performance should be evaluated with metrics that reflect actual user experience rather than vanity scores.
4.1 Core Web Vitals
These are the primary metrics recommended by Google to measure real-world performance:
-
Largest Contentful Paint (LCP)
- Measures loading performance
- Target: under 2.5 seconds
- Represents how quickly the main content becomes visible
-
First Input Delay (FID)
- Measures interactivity
- Target: under 100ms
- Indicates how quickly the app responds to user input
-
Cumulative Layout Shift (CLS)
- Measures visual stability
- Target: below 0.1
- Prevents content from “jumping around” while loading
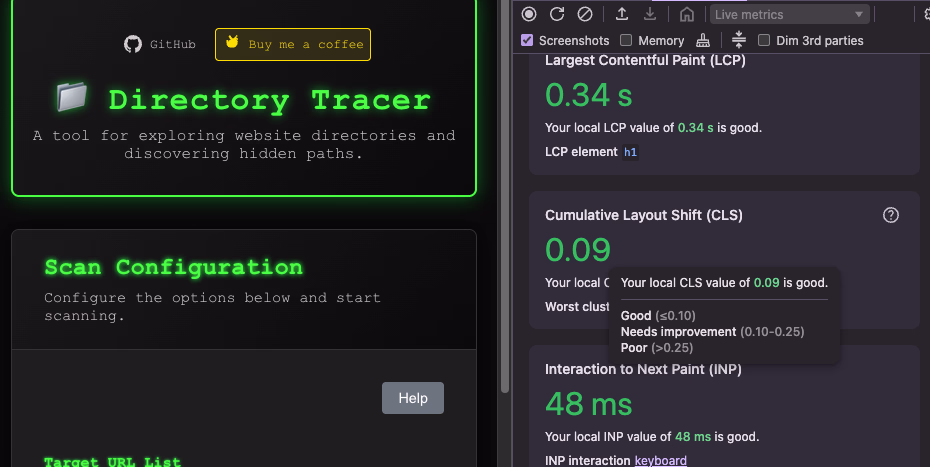 Figure: Further improvements after caching and prefetch refinements.
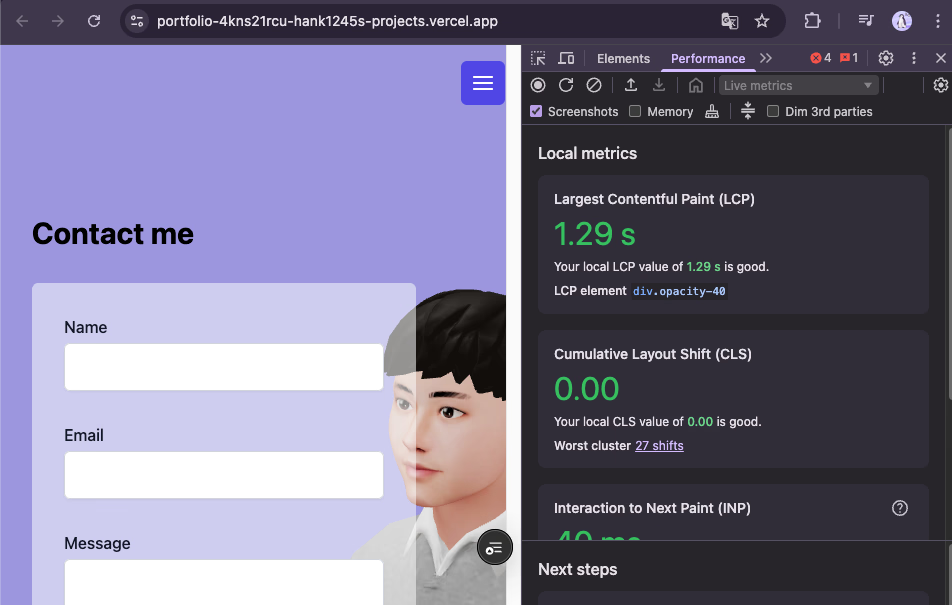 Figure: First round of optimization showing baseline improvements.
4.2 Tooling
- Lighthouse: Automated performance auditing tool
- Chrome DevTools: Provides detailed breakdown of load times, network requests, and rendering
- Real User Monitoring (RUM): Collects performance metrics from actual users instead of synthetic benchmarks
5. Prioritization: What to Do First
Since not all optimizations provide equal value, it’s important to focus on high-impact, low-effort changes before moving to advanced techniques.
Practical Order of Implementation
-
Image Lazy Loading
- Simple attribute change (
loading="lazy") - Immediate performance boost on media-heavy pages
- Simple attribute change (
-
Code Splitting
- Reduce initial bundle size
- Improve Time to Interactive (TTI)
-
React Query (or SWR)
- Cache API responses
- Eliminate redundant network requests
-
Bundle Analysis
- Identify oversized dependencies
- Remove or replace heavy libraries
-
Prefetching
- Smooth out navigation latency
- Apply selectively to avoid overloading network
6. Resource Prefetch vs Data Prefetch
This distinction is often confusing but is crucial for implementing comprehensive optimization strategies.
Resource Prefetch (Browser Level)
- Implementation:
<link rel="prefetch">, Next.js prefetch, Webpack comments - Purpose: Downloads static assets like JS, CSS, images ahead of time
- Management: Handled by the browser and bundler
- Example: Prefetching route chunks for faster navigation
<link rel="prefetch" href="/about-chunk.js" as="script" />
Data Prefetch (Application Level)
- Implementation: Libraries like React Query provide
queryClient.prefetchQuery - Purpose: Fetches API responses and caches them in memory
- Management: Handled by application-level state management
- Example: Prefetching user data before navigation
// Data prefetch example
queryClient.prefetchQuery(["user", userId], () => fetchUser(userId));
Key Differences
- Resource prefetch = “download code/assets ahead of time”
- Data prefetch = “fetch API results ahead of time”
Both techniques work together to create seamless user experiences, but they operate at different levels of the application stack.